Unknown Welding Transformer: Difference between revisions
From CoMakingSpace Wiki
(→Unknown Welding Transformer: closing #154 & commissioning - documentation was added a few months ago and the photo shows repaired cables) |
m (→Unknown Welding Transformer: status) |
||
| Line 10: | Line 10: | ||
|used with=[[Welding Helmets|welding helmets]], [[Welding Curtains|welding curtains]] | |used with=[[Welding Helmets|welding helmets]], [[Welding Curtains|welding curtains]] | ||
|location=[[Location::Welding Area]] | |location=[[Location::Welding Area]] | ||
|status= | |status=working | ||
|manual=''a bit similar, but NOT the same tool'':<br>[https://assets.einhell.com/manuals-pdf/900_422785/tc-ew-150.pdf Einhell.com] | |manual=''a bit similar, but NOT the same tool'':<br>[https://assets.einhell.com/manuals-pdf/900_422785/tc-ew-150.pdf Einhell.com] | ||
|assetid=174 | |assetid=174 | ||
|similar=welding inverter | |similar=welding inverter | ||
}} | }} | ||
Latest revision as of 15:05, 22 April 2024
Unknown Welding Transformer
| MachineInfoBox Welding Transformer | |
|---|---|

| |
| Synonyms: | stick welder, arc welder, "welding machine"; DE: Elektrodenschweißgerät, Lichtbogenschweißgerät, Schweißtrafo, Schweißtransformator |
| Type: | Welding Transformer |
| Material: | welding electrodes, steel (or other compatible metals) |
| Used with: | welding helmets, welding curtains |
| Location: | Welding Area |
| Access Requirements: | Arc Welding Introduction |
| Status: | working |
| Manual: | a bit similar, but NOT the same tool: Einhell.com |
| Tutors: | Lukas Johannes Marcel |
| Similar (More or Less): | welding inverter |
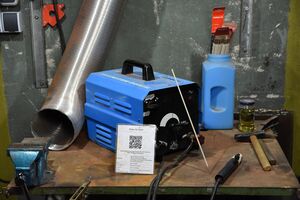
We have improved a simple old welding transformer as far as it was worth it.
It can be used for SMAW ("stick" welding) after a personal introduction!
Settings
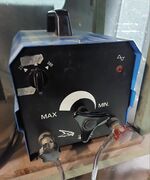
The large tri-star knob on the front adjusts the current ("amps"). In general, you'll need higher current for thicker electrodes.
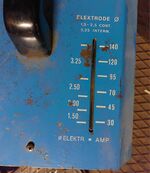
The approximate thickness range and currents are indicated by a yellow pointer at the top - take the time to find your optimum so you do not get stuck (insufficient current) or burn through thin workpieces (often a sign of excessive current)!

